It’s that time of year when the gardens burst into life and dinner looks brighter and brighter every day. In other words, pesto season! This easy summer recipe pairs well with everything from fresh pasta to grilled vegetables or a cold summer salad.
In this spinach pesto recipe, we sub out the traditional basil for spinach, and the results are not only delicious but nutritious as well!
Key Ingredients for Spinach Pesto
-
Spinach: The spinach is the star of the show. You can use any type of spinach, but chop the ends off if you use bunched spinach. Be sure to wash your greens to avoid a gritty pesto.
-
Olive oil: For the tastiest pesto, use a quality olive oil. Pesto has such limited ingredients, so a bright and grassy extra virgin olive oil can elevate the final product.
-
Walnuts: We use walnuts in this recipe instead of the traditional pine nuts. The walnuts help thicken the sauce and provide a creamy element; they’re also much cheaper.
-
Parmesan or Pecorino Romano: A firm, salty cheese is essential to any pesto. Fresh grated is the tastiest but you can definitely substitute pre-shredded.
-
Garlic: Bring out the flavor of everything with some fresh cloves of garlic.
-
Lemon juice: No herb sauce is complete without an acid, and for pesto we use lemon juice. The acid of the lemon works with the salt to help balance all the flavors.
Spinach Pesto Recipe

Ingredients
- 2-1/2 cups packed spinach leaves
- 1/3 cup walnuts
- 1/4 cup grated Parmesan or Pecorino Romano
- 2 cloves garlic
- Juice from 1/2 lemon
- 1 teaspoon kosher salt
- 1/2 cup extra virgin olive oil
Directions
Step 1: Process walnuts

In the bowl of a food processor, pulse the walnuts and garlic until roughly chopped. Don’t take the walnuts too far, you’re not looking for a paste.
Step 2: Pulse remaining ingredients

Scrape down the bowl, then add spinach, grated cheese, lemon and salt. Process until everything is broken down, but still has some texture (over-processing can lead to too smooth a sauce).
Pulse 3: Emulsify

While pulsing the food processor, drizzle in the oil. Allow to blend well but, again, you don’t want to take it too far.
Serve and enjoy!
Spinach Pesto Tips
How to store spinach pesto
This spinach pesto is delicious when served fresh from the food processor, but you can make it last much longer. Pesto can be stored in the fridge in an airtight container for up to one week or frozen for later use.
Ice cube trays store perfect serving sizes of pesto. Simply spoon into the cubes, and you’ll have individual portions to pull as needed. To keep its brightness, wait to add the lemon juice and salt until just before serving.
What else to add to spinach pesto
Like traditional pesto, recipes for spinach pesto can easily be personalized, so it’s a great way to use up excess greens from the crisper. Cut out some of the spinach and sub in some leafy greens, basil or parsley. I also enjoy pesto made with pepitas in lieu of pine nuts. And for an extra bite of acid, use both lemon zest and the juice.
Lately, frozen fruit recalls have been dominating the headlines. In June, frozen fruit sold at Costco was recalled over hepatitis A concerns. Then, shortly after, that recall expanded to grocery chains across the country.
Now, the Food and Drug Administration (FDA) has shared a vast recall of frozen fruit due to listeria concerns. This affects some major retailers, including Walmart, Target, Trader Joe’s and Aldi.
Before using frozen fruit to blend a healthy smoothie for breakfast, here’s what to know.
What Caused the Recall?
Sunrise Growers Inc., issued a recall of frozen fruit products because its third-party supplier provided pineapple that may contaminated with listeria. However, this recall affects far more than frozen pineapple, possibly because of cross-contamination at the processing facility.
Voluntary Recall of Specific Frozen Fruit Products Due to Possible Contamination by Listeria monocytogenes https://t.co/FogJ8U5BXy pic.twitter.com/ASyGiOGQPM
— U.S. FDA Recalls (@FDArecalls) June 22, 2023
The recalled frozen fruit was sold at chains across the country, like Walmart and Trader Joe’s. The following retailers and products are included in the recall:
- Walmart: 16-ounce plastic bags of Great Value Mixed Fruit, Great Value Dark Sweet Cherries and Great Value Mango Chunks sold at retailers in AR, AZ, CA, CO, DC, IA, ID, IL, IN, KS, KY, LA, MD, MN, MO, MT, ND, NE, NM, NV, OH, OK, OR, PA, SD, TX, UT, VA, WV and WY from Jan. 19, 2023 to June 13, 2023.
- Whole Foods: 32-ounce plastic bags of 365 Organic Tropical Fruit Medley, 10-ounce plastic bags of 365 Organic Pineapple Chunks, 16-ounce bags of 365 Pineapple Chunks, 32-ounce plastic bags of 365 Organic Whole Strawberries, 365 Organic Slice Strawberries and Bananas, and 10-ounce plastic bags of 365 Organic Blackberries distributed to select stores throughout the US from Nov. 1, 2022 to June 21, 2023.
- Trader Joe’s: 16-ounce plastic bags of Trader Joe’s Organic Tropical Fruit Blend distributed to select distribution centers or stores in AK, AL, CT, CO, DE, IA, IL, IN, KS, KY, LA, MA, MD, ME, MI, MN, MO, NE, NH, NJ, NM, NY, OH, OK, PA, RI, TN, TX, VA, VT, WI, and Washington DC from March 28, 2023 to April 11, 2023
- Target: 32-ounce plastic bags of Good & Gather Organic Cherries and Berries Fruit Blend, 12-ounce plastic bags of Good & Gather Dark Sweet Whole Pitted Cherries, 48-ounce bags of Good & Gather Mango Strawberry Blend, 48-ounce plastic bags of Good & Gather Mixed Fruit Blend, 12-ounce plastic bags of Good & Gather Mango Chunks, 48-ounce bags of Good & Gather Blueberries, and Good & Gather Triple Berry Blend distributed nationwide from October 14, 2022 to May 22, 2023.
- Aldi: 32-ounce plastic bags of Season’s Choice Tropical Blend distributed to select distribution centers or stores in AL, AR, CT, FL, GA, IA, KS, KY, MA, MD, MI, MO, MS, NC, NE, NH, NY, OH, OK, PA, RI, SC, TN, TX, VA, VT and WV from October 11, 2022 to May 22, 2023.
- AWG (Associated Wholesale Grocers): Best Choice Pitted Red Tart Cherries Unsweetened distributed to select distribution centers or stores in KS, MO, NE and OK from April 5, 2023 to May 4, 2023.
How Do I Know If I Have a Recalled Product?

You should check the affected lot codes and “Best By” dates on any frozen fruit in the list above. The FDA provided an extensive list of codes on its website.
What Is Listeria?

According to the FDA, listeria is “an organism which can cause serious and sometimes fatal infections in young children, frail or elderly people, and others with weakened immune systems.” While listeria may not be deadly in those who are healthy, it can still cause high fevers, severe headaches, stiffness, nausea, abdominal pain and diarrhea.
So far, there have been no reports of illness in connection with this recall.
What Should I Do If I Have a Package of Recalled Fruit?
If you have a recalled product at home, don’t eat it. Instead, throw the fruit away or return it to the retailer for a full refund.
And if you have lingering questions or concerns, contact [email protected] or call 1-888-490-5591 weekdays from 8 a.m. to 5 p.m. PT.
In the Midwest, the definition of “salad” is pretty loose. Yes, green salads, pasta salads and potato salads are all welcome at the dinner table. But it’s not unusual to see Jell-O salads or fluff salads served up at the potluck. I grew up enjoying many of these, including the wonderful and inexplicable Candy Bar Apple Salad.
Despite my Midwest pedigree, however, I have never tried one particular fluffy side: cookie salad!
What Is a Cookie Salad?
So what is a cookie salad anyway? To learn more about this sweet side, I talked to fellow Midwesterner and cookie salad expert—not to mention one of my favorite foodie celebs—Molly Yeh.
First, Molly says, “You have to get past the fact that it’s called a salad.”
She then explains that cookie salads are made up of a few basic components: cookies, fruit, pudding and cream. Crushed cookies and fruit get folded into a mix of cream and pudding. Then it’s all spooned into a serving dish and gets topped with a few more cookies. It’s almost akin to a dirt cake or a banana pudding—but it’s served with dinner.
The most popular cookie salad combination is made with vanilla pudding, whipped topping, mandarin oranges and fudge-striped shortbread cookies.
Molly’s biggest tip for serving cookie salad: “Don’t let it touch your hot dish and just try it. You will like it.”
Molly Yeh’s Favorite Cookie Salad Recipe
While the shortcut cookie salad is delicious, Molly says a fully homemade version is worth the extra effort. “I love to make all of the elements from scratch,” she says.
Here’s how to make Molly’s signature cookie salad.
Ingredients
For the fluff:
- 6 tablespoons sugar
- 3 tablespoons flour
- 3 egg yolks
- 1-1/2 cups heavy whipping cream
- 1/4 teaspoon salt
- 1 teaspoon vanilla extract
- 1 teaspoon almond extract
- 1-1/2 cups heavy whipping cream
- 1/4 cup confectioners’ sugar
For the cookies:
- 1 cup flour
- 1/2 cup confectioners’ sugar
- 1/2 teaspoon salt
- 1 teaspoon vanilla extract
- 1/2 teaspoon almond extract
- 1/2 cup butter, cold and cubed
- 5 ounces chocolate chips, melted
For the rest:
- 2 (11-ounce) cans mandarin oranges
- Sprinkles
Directions
Step 1: Make the pudding

In Minnesota and the Dakotas, most cookie salad recipes start with packaged pudding; but Molly says that making pudding from scratch is what takes this treat over the top.
Start by combining flour, salt and sugar in a saucepan. Then whisk in the egg yolks and cream and heat over medium heat. Stir this mixture constantly until it has thickened and it coats the back of a spoon. This does take time. I was stirring for about 10 minutes before the mix came together.
Then stir in the vanilla and almond extracts.
Next, move the pudding into a bowl and cover it with plastic wrap, waxed paper or parchment. Make sure that the paper touches the pudding so it doesn’t form a skin.
Chill for at least an hour. You can also prep the pudding component a day in advance.
Step 2: Stir up the cookie dough

While the pudding cools, it’s a good time to start making the dough for the cookies. Start by whisking together the flour, confectioners’ sugar, salt and extracts together.
Then add in the cold butter and beat in a stand mixer fitted with the paddle attachment. Start slow and then increase the speed as the butter begins to break down.
Once combined, divide the dough in half and chill for at least 30 minutes in the fridge.
Editor’s Tip: The cookie dough is very crumbly. After mixing for a bit, pause and press a handful together. If it holds, it’s ready to chill.
Step 3: Roll out the cookies

Next, dust your work surface with a bit of flour and roll out the dough until it’s about 1/4- to 1/8-inch thick. Then cut out into rounds using a 2- or 3-inch round cookie cutter. To get the hole in the middle, I used a piping tip. The opening size was just right.
Reroll the dough once or twice more. In the end you should have 18 to 24 cookies—depending on the size of the cookie cutter you use.
Step 3: Bake and cool

Bake the cookies at 350ºF for 11 to 12 minutes or until the edges just start to turn golden. Once they start to get that warm color, take them out of the oven and move them to a wire rack to cool completely before moving to the next step.
Step 4: Add the chocolate

When the cookies are finally cool, melt the chocolate chips. Use a spoon or piping bag to drizzle the chocolate over the top of the cookies in a zig-zag pattern.
Wait until the chocolate has set before you start assembling. You can expedite this process by popping the chocolate-topped cookies in the fridge or freezer.
Step 5: Make the whipped cream

The last homemade component of this cookie salad is fresh whipped cream. Molly’s recipe calls for just heavy whipping cream and confectioners’ sugar beaten together. I added a splash of vanilla extract for a bit more flavor.
To make whipped cream, combine all the ingredients in a mixing bowl and beat with a hand mixer. You can also use the whisk attachment on your stand mixer. Beat until soft peaks form; that means when you lift the beaters out of the bowl, the cream will cling and form peaks that droop slightly.
Step 6: Fold the pudding and whipped cream together

With your whipped cream and pudding both complete, it’s time to fold them together.
Start by taking your pudding and giving it a quick stir to loosen it up. Then fold in the whipped cream in a few batches using a large, flexible spatula. Take your time here. In the end, the mixture should be rich yet fluffy.
Step 7: Put it all together

Take all but six to eight cookies (you’ll want them to finish the top) and crush them with a rolling pin until you have a good cookie crumble (don’t crush them too finely—just enough to break them up).
Then drain the mandarin oranges; again, keep a few aside for decoration.
Stir the cookie crumbles and oranges into the pudding until combined and spoon it into the serving dish of your choice. You can layer this dessert into a large dish or even spoon it into small custard cups.
Step 8: Garnish the top

Use the reserved cookies and mandarin orange slices to decorate the top of the cookie salad. Molly’s recipe also calls for optional sprinkles. As a like-minded sprinkle fanatic, I had to add them!
You can serve the cookie salad immediately or stash this in the fridge until you’re ready.
Cookie Salad Tips
Can you make cookie salad with premade ingredients?
Absolutely! In fact, most Midwesterners make this salad with packaged ingredients (and it’s delicious that way, too). Instead of from-scratch components, you can use a box of pudding mix, whipped topping and store-bought cookies. You can use any cookie you like, but Keebler Fudge Stripes are a popular pick.
What other flavors of cookie salad can you make?
According to Molly, “Once you figure out the format and the equation—the cookie salad equation— you can add different flavors and really make it your own.”
Molly says that she often switches up the pudding by infusing the cream with different flavors or even using dairy-alternative milks. You can change up the flavor with any of your favorite pudding mixes as well.
You can also swap in different cookies. Store-bought favorites like Milano cookies would be welcome. You can also try shortbread, pecan sandies or any cookie jar favorite.
Can you make cookie salad in advance?
While you do want the cookies to soften up a little bit, I wouldn’t recommend prepping this more than a day in advance. Any further out and you’ll have less of a cookie salad and more of a cookie mush.
St. Louis Gooey Butter Cake
If you ask a Missourian, gooey butter cake is at the top of the list of great Midwest desserts. This cake is unfussy and unfrosted but has seriously rich flavor. For optimal results, use the best butter you can find.

Chocolate Scotcheroos
No Midwestern bake sale or church potluck is complete without a pan of scotcheroos! These no-bake bars are simple to stir up and combine two beloved flavors: peanut butter and chocolate. 
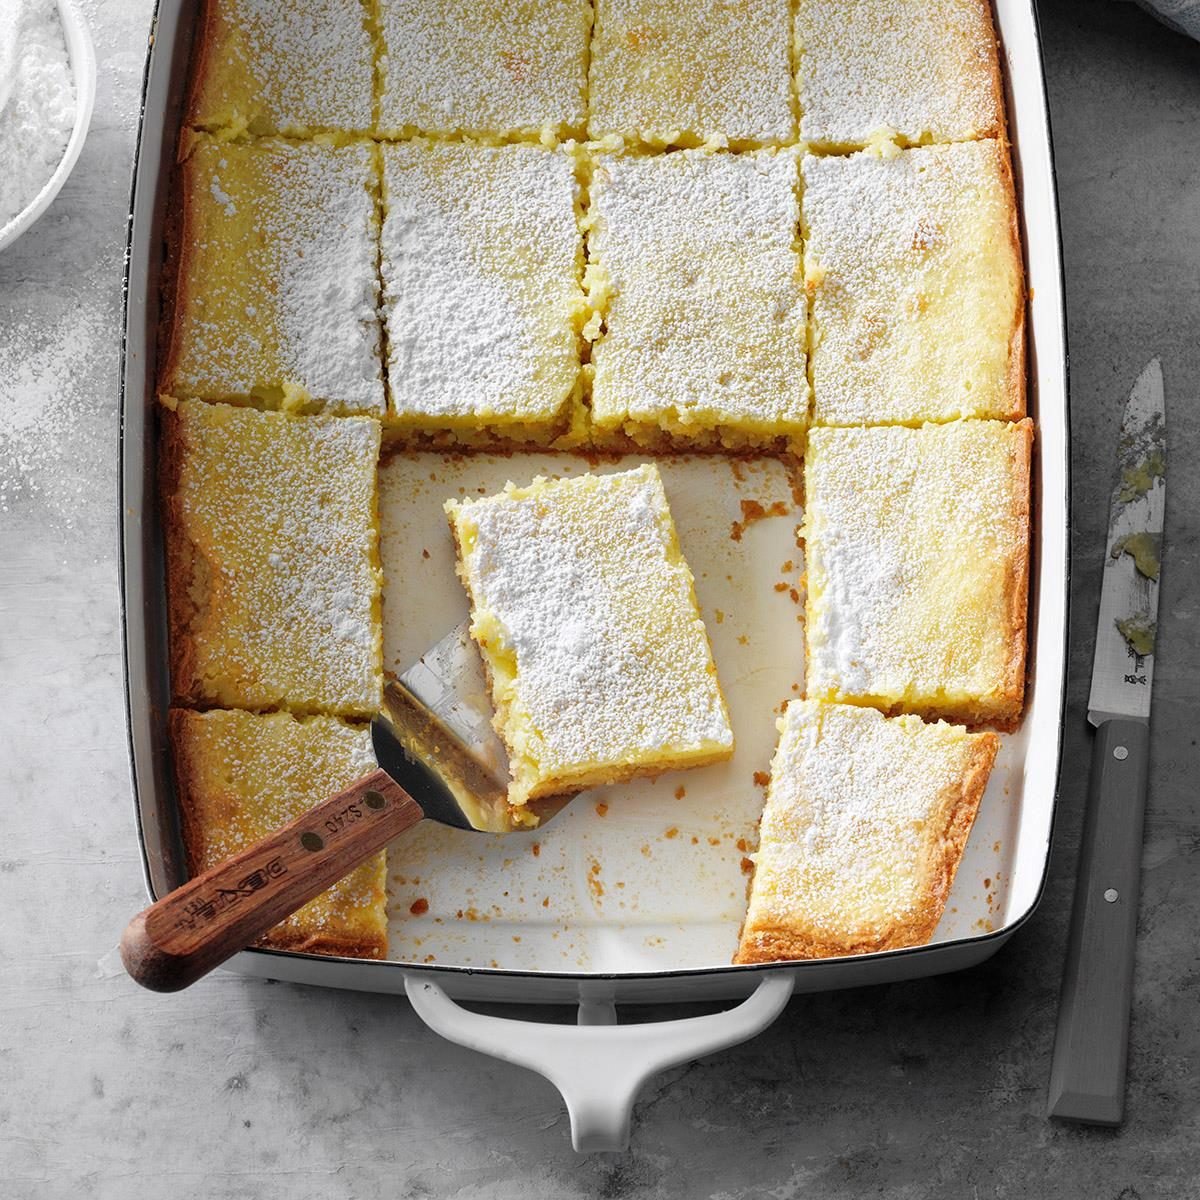
Shaker Lemon Pie
Also known as Ohio lemon pie, this Shaker lemon pie is a Midwestern favorite. Its thrifty use of whole lemons is unique and gives the pie a lovely combination of sweet and tart. It's also a great way to make use of your cast-iron skillet. 
Strawberry Pretzel Dessert
While the combination of strawberry and pretzel may seem inexplicable, it's a darn tasty combo that you'll find in many Midwestern recipe boxes. The mix of sweet, salty, cool and creamy always hits the spot. And if you want to level up, you can try Arley Bell's twist on this treat: a strawberry pretzel cake! 
Michigan Bumpy Cake
This funny-sounding cake has been pleasing Michiganders for more than 100 years. Back in 1913, the folks at Sanders Chocolates created this cake: essentially a chocolate cake with buttercream and a chocolate glaze. The buttercream bumps have been part of the formula since the start and soon what was once called "Sanders Devil's Food Buttercream Cake" became known as "Bumpy Cake."
You can still get bumpy cakes straight from Sanders, but why not try our version of the recipe right in your own kitchen?

Rhubarb Coffee Cake
Rhubarb is very common in many Midwestern gardens. Come springtime, folks harvest stems and use them in all kinds of seasonal treats, including this coffee cake. 
Magic Bars
Some folks call these seven-layer bars, others magic bars and there are even a few that dub them Hello Dolly bars. No matter the title, this is a Midwest dessert that hits the spot every time. You can try different types of magic bars, but know they all have one thing in common: They are so easy! 
Kringle
In the Midwest, particularly in Wisconsin, kringle is serious business. This treat is made of buttery, laminated Viennese pastry dough, filled with fruit or nuts and then topped with a simple sugar glaze. It's a great Midwest dessert, and it also can easily serve as breakfast with a cup of coffee.

Sugar Cream Pie
Sugar cream pie is Indiana's state dessert. It's a great recipe to keep in your back pocket because it can be made with ingredients you typically have right in the pantry. 
Apple Crisp
Come fall, folks flock to nearby orchards to go apple picking. You'll find that so many types of apples are grown throughout the region, though classics like Cortland, Northern Spy and Empire are always great for baking. Use them in one of the best Midwest desserts of all time: apple crisp. Be sure to serve it warm with a scoop of ice cream. 
Candy Bar Apple Salad
Only a Midwesterner possesses the charm to serve up a mixture of Cool Whip, apples and chopped-up candy bars and serve it up as a salad. Press pause on putting this dish out on the dinner table and instead share it for dessert. 
Cherry Hand Pies
Tart cherries thrive in the northern part of the Midwest. Both Michigan and Door County in Wisconsin grow these tiny fruits with pride. While you can bake cherries into all kinds of desserts, these hand pies from Wisconsin native Allison Cebulla are exceptionally tempting. 
Cookie Brittle
This recipe comes from the queen of Midwest desserts and author of Midwest Made, Shauna Sever. These treats have all the flavors of your go-to chocolate chip cookie but don't require any fuss. Just stir them up with a wooden spoon and bake them in a sheet pan. Once baked, just break the goodies into shards to share and enjoy.

Frozen Custard
Think of frozen custard as ice cream's smoother, more decadent cousin. This is thanks to the custard base that uses egg yolks. The result is creamier and just a bit more indulgent. You can make a batch yourself at home or travel the region and stop at local frozen custard shops. 
Buckeyes
No list of Midwest desserts would be complete without this Ohio staple. Buckeyes are essentially a mix of the best two sweet flavors of all time: peanut butter and chocolate. 
Paczki
The Midwest is home to a large Polish-American population, so it's no wonder that these Polish doughnuts are so popular there! Paczki are fried, filled with jam and then tossed in sugar. 
Fudgy Brownies
Did you know that brownies were invented in Illinois? They were created for the Columbian Exposition back in 1893. More than a hundred years later, there are plenty of brownie recipes to experiment with, though this fudgy brownie from Taste of Home's Executive Culinary Director Sarah Famer's kitchen is one of the best! 
Bundt Cakes
Nordic Ware has been manufacturing Bundt pans in Minnesota for more than 75 years, so it's no wonder that Bundt cakes of all kinds are extremely popular in the Midwest. Just make sure to grease the pan well and you'll end up with a delightful dessert worth sharing. 
Dirt Cake
Dirt cake or dirt dessert can be found at many a kid's birthday party. Made with crushed Oreos, cream cheese and pudding, it's a treat that no kid can resist. For extra kid-friendly appeal, top this Midwest dessert with plenty of gummy worms. 
Fresh Plum Kuchen
German immigrants brought kuchen recipes with them when they immigrated to the region. Now, kuchens of all kinds are some of the most beloved Midwest desserts. This one made with fresh plums is delicious, though you can swap in any stone fruit.
Warm, flaky, buttery puff pastry makes everything taste better. In a pie or tart, it can highlight fresh, savory veggies or complement sweet seasonal fruits. These days, you don’t even have to make it yourself: store-bought puff pastry yields elegant dishes with very little hassle.
So, it’s no wonder that TikTok has recently become obsessed with the kitchen staple. In particular, food influencers have been making numerous upside-down tarts. While the viral pineapple upside-down pastries are amazing, there’s no limit to the quick, delicious dishes you can make with puff pastry. Here’s how to transform any produce into a beautiful upside-down puff pastry tart—sweet or savory!
A Brief History of Baking Puff Pastry Tarts Upside-Down
While TikTok is bringing the upside-down puff pastry baking technique to a new generation of home cooks, the technique actually dates well back to the 19th century. Legend has it that in the 1880s, French baker Stéphanie Tatin accidentally placed her apple tart in the oven upside-down. This flub yielded surprisingly delicious results and the famous Tarte Tatin was born. Ever since then, bakers around the world have continued experimenting with baking tarts upside-down—we particularly love this Blood Orange Caramel Tarte Tatin.
Why Baking Puff Pastry Tarts Upside-Down Works
Baking puff pastry tarts upside-down works for two main reasons: the caramelization of the fruit and the crispiness of the puff pastry.
Food influencer Lily Ghodrati (@lilyghodrati), who has become famous for her puff pastry tarts, explains to GMA: “An advantage of laying the fruit down first and placing the puff pastry on top is it prevents the pastry from becoming soggy. So you end up with a well-cooked flaky pastry while the fruit gets caramelized on the bottom, just like a Tarte Tatin.”
How to Make Upside-Down Puff Pastry Tarts
Check out the videos below to see exactly how Ghodrati makes her easy and elegant upside-down puff pastry tarts.
Sweet Upside-Down Puff Pastry Tarts
In one video that has garnered over 42.5 million views, Ghodrati makes caramelized honey and nectarine pastries. To start, she drizzles rectangles of honey onto a parchment paper-lined baking sheet. Then, she stacks nectarine slices on top of the honey, covers them with a larger rectangle of puff pastry, crimps the edges, and applies a light egg wash on top. After baking, she flips over the pastries and tops them off with a sprinkle of sifted powdered sugar.
@lilyghodrati Caramelised Honey & Nectarine pastries 🍯 #honey #nectarine #pastry #pastries #patisserie #puffpastry #caramelised #bake #baking #sweet #snack #foodhack #EasyRecipe #Recipe #eats #food #FoodTok #Foodie #fy #fyp #foryou #foryoupage ♬ Sleep Walk – Santo and Johnny
Savory Upside-Down Puff Pastry Tarts
For a savory rendition of the puff pastry treat, Ghodrati drizzles olive oil, balsamic vinegar, and maple syrup onto a parchment-lined baking sheet. She then tops this mixture with a slice of onion, a sprinkle of fresh thyme leaves, salt, pepper, and finally the rectangle of puff pastry. As with the sweet rendition, she crimps the edges down and applies an egg wash before baking.
@lilyghodrati 🧅🌿 #balsamic #thyme #caramelisedonion #pastry #pastries #puffpastry #caramelised #bake #baking #patisserie #snack #foodhack #EasyRecipe #Recipe #eats #food #FoodTok #Foodie #fy #fyp #foryou #foryoupage ♬ Howl’s Moving Castle – Merry Go Round of Life – Vitamin String Quartet
Customizing Your Upside-Down Puff Pastries
To make your own caramelized upside-down puff pastries, you can follow a basic formula: sugar + produce + puff pastry + egg wash. The sugar aids in the caramelization and could be granulated sugar, brown sugar, honey, maple syrup or agave. The produce should be fresh, but “firm and not fully ripe yet, since it holds its shape better,” according to Ghodrati. To add even more flavor, place cheese, herbs or spices on top of the produce before laying down the puff pastry.
To bake the pastries, I recommend starting for 20 minutes at 350 degrees, though you may need more time to achieve optimal caramelization. And be sure to try out some of our favorite desserts and appetizers using any leftover puff pastry!
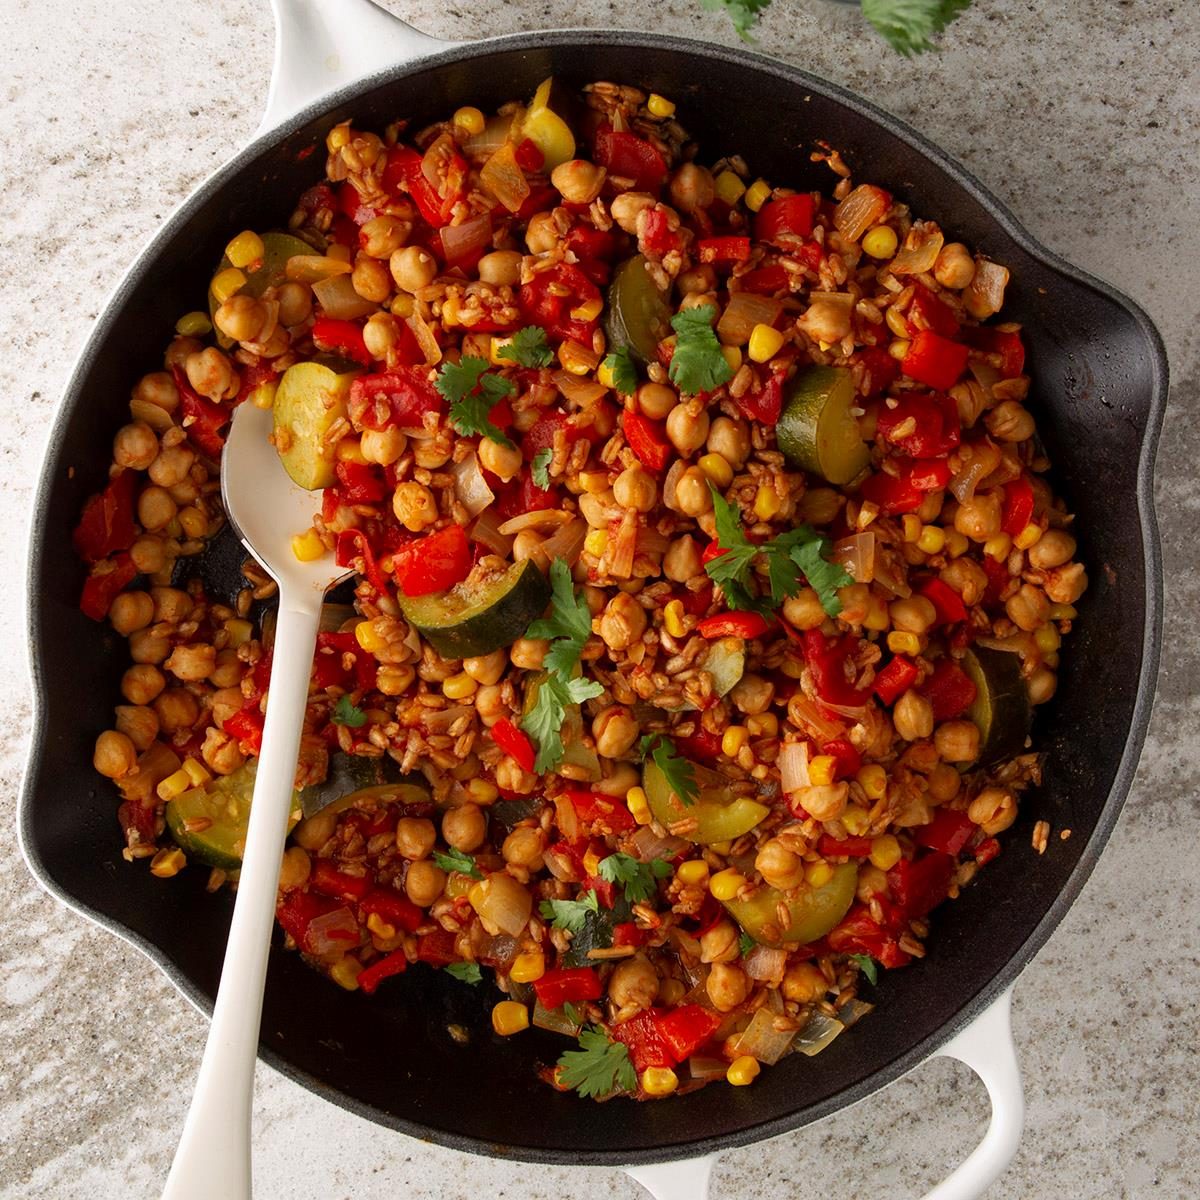
Ancient grains—whole grains that have been part of the human diet for thousands of years—are nutritious additions to your pantry. Mild-tasting, versatile farro is an easy ancient grain to incorporate into your diet. But what is farro, exactly, and how do you cook it? Here’s a quick introduction.
What Is Farro?
Farro is an ancient grain, a form of wheat that’s about 20,000 years old. With roots in Mesopotamia, farro is a staple of Mediterranean diets, especially in Italy. Farro is sold in whole grain form, and might be one of three varietals of ancient wheat: einkorn, emmer or spelt. All forms of farro have a pleasant nutty flavor and a slightly chewy texture after cooking. It’s a hearty addition to a whole-grain dinner.
Types of Farro
In American grocery stores, farro is generally found in three forms: pearled, semi-pearled and whole. Pearled farro is the most common and the quickest to cook, since the bran has been removed from the grain. Unfortunately, removing the bran also reduces the amount of fiber and nutrients. You can also buy semi-pearled farro, which retains some of the bran, as well as whole grain farro.
Nutrition Benefits
Farro, especially in whole-grain form, is an excellent source of fiber and protein. It’s also rich in antioxidants, as well as iron, magnesium and zinc.
Is Farro Gluten-Free?
Since farro is a form of wheat, it is not gluten-free. Gluten-free alternatives to farro include whole-grain quinoa, sorghum, buckwheat, millet and wild rice.
How to Cook Farro
Cook farro as you’d cook any whole grain: simmer in liquid until tender. Many cooks soak farro before cooking. Whole grain farro should soak overnight, while pearled and semi-pearled varieties benefit from soaking for 30 minutes or more. Cook farro in water or broth at a ratio of one part farro to three parts liquid. Soaked farro will cook in about 15 minutes, while unsoaked or whole grain farro will be al dente in 30 minutes or so.
It’s simple to cook farro in a pot on the stove (similar to cooking brown rice). You can also use a rice cooker, which will cook farro hands-free, or a pressure cooker (like the Instant Pot) to cook farro quickly.
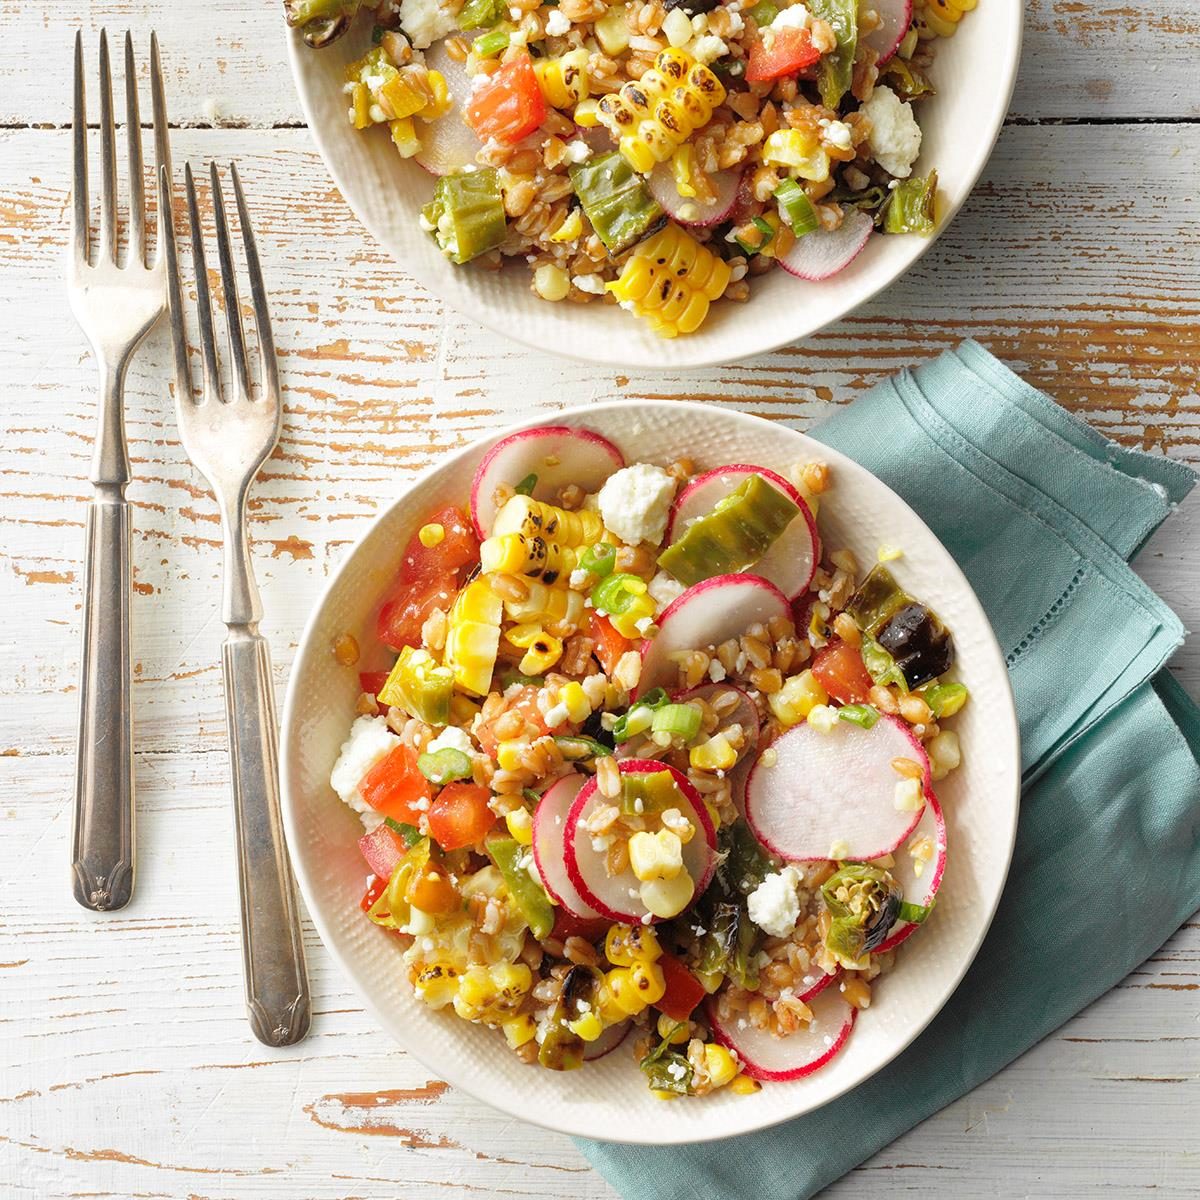
How to Eat Farro
Cooked farro tastes delicious in a grain salad, where its pleasantly chewiness adds texture and substance. Farro makes a hearty side dish for fish and other heart-healthy dinners. You can also stir cooked farro into a soup or stew.

Sriracha isn’t just another bright red hot sauce, it’s an obsession. Devoted fans (like us) put it on everything, from scrambled eggs to pho, burritos, burgers, grilled cheese, pizza and so many other things (here are some of our favorite Sriracha recipes).
California-based Huy Fong Foods’ “rooster sauce,” known as such because of the logo, is the most ubiquitous Sriracha chili sauce brand. Producing about 20 million bottles a year, it’s reached iconic status that goes way beyond a condiment—it’s inspired cookbooks, clothing and numerous knock-offs.
So when you hear about a(nother) Sriracha shortage, it’s big news. If it’s not supply chain issues, it’s climate change affecting garlic and chile pepper harvests. And without those, that potentially means a lot fewer bottles of sriracha out there, and life is just too short to go without a dash of extra spice.
What’s the Best Substitute for Sriracha?
Based on a popular Thai condiment, Sriracha (pronounced see-ROTCH-ah) is most commonly made with red jalapeno peppers, garlic, distilled white vinegar, sugar and salt. The original version is thicker than a liquid hot sauce, more like a paste. But most Sriracha you find on grocery store shelves today is thin enough to squeeze through a nozzle.
Any hot sauce worth its Scoville rating is made with similar ingredients as sriracha, but each has its own distinctive flavor depending on the chiles used, the spices, and how much water or sugar is in it. Some are more mild, some spicier; some even have a little sweetness. If you didn’t stock up for the impending Srirachapocalypse, there are plenty of other spicy substitutes for Sriracha out there.
Tapatio

Based on Mexican salsa picante but made in California, Tapatio has a little more heat than Sriracha, but it won’t burn your face off. Made with red chile peppers (though we don’t know exactly which ones), vinegar, garlic, salt and spices, it’s on the thinner side of the hot sauce spectrum but has a great flavor.
Like Sriracha, it’s a good hot sauce to shake on eggs, tacos, rice dishes and anything else that needs a nice kick of heat. You can find Tapatio on grocery store shelves just about everywhere.
Cholula

Many Mexican-style hot sauces have a thinner consistency than sriracha, and they have varying amounts of vinegar if any at all. Cholula is a bit more complex than most, however. Thanks to its use of arbol chiles and pequin peppers, plus vinegar, garlic powder, salt and spices, it’s a delicious smoky, tangy and slightly spicy hot sauce. It’s not face-meltingly hot, but there’s a nice amount of heat to go around.
Add Cholula to soups and stews, add a splash or two to tacos or taco dip, stir into Spanish rice or drizzle over eggs, potatoes or roasted vegetables. Basically, anywhere you’d use Sriracha, you can use Cholula. It’s widely available in grocery stores across the country.
Tabasco

Everyone has a bottle of Tabasco hot sauce somewhere. A kitchen staple for generations, born and still produced in Louisiana, Tabasco’s original formula is simply made from tabasco peppers, vinegar and salt. The thin, slightly salty sauce is super versatile and can be used either as a condiment or a cooking ingredient. It’s slightly hotter than Sriracha, but you can still use it as a good substitute.
Use Tabasco in marinades, mixed into dips or noodle bowls, and add to sauces, like for these slow-cooker pulled pork sandwiches. Sprinkle it over eggs, pizza, tacos, burgers and more. Louisiana-style hot sauce is what you typically use in Buffalo chicken recipes, and it’s most important for a proper Bloody Mary (after vodka of course).
Chili Crisp

Spicy chili crisp is up there with Sriracha as far as trendy condiments go, with many versions on the marketplace today. A blend of various peppers, dried garlic, onion, spices and sometimes peanuts, it has an umami savoriness and just enough heat to keep things interesting. It’s not really a sauce or a paste, just all crispy texture, spice and everything nice.
Use chili crisp on anything: Eggs, avocado toast, baked potatoes, tacos, pasta dishes, steaks, fish, any pizza recipe and more. It’s even good on vanilla ice cream! You can find chili crisp just about anywhere now. LoaGanMa was the original out of China, but now there’s Fly by Jing’s Sichuan Chili Crisp, Mr. Bing Chili Crisp, celebrity chef chili crisps, and of course Trader Joe’s own brand.
Chili Oil

Chili oil and chili crisp aren’t exactly the same thing, but they do come from the same family of condiments. Usually made with vegetable or sesame oil simmered with red chile pepper flakes, ground Sichuan peppercorns, garlic, star anise and paprika, it’s more of an oil flavored with chile peppers. Chili crisp, by contrast, has dried ingredients and crunchy goodness sort of suspended in oil; you scoop it all up.
You’ll see this dark red oil on the table at Chinese restaurants, especially those specializing in Sichuan cuisine. We love to drizzle it on soup dumplings, pork and chive pot stickers, noodles of any kind, in any stir fry or on scallion pancakes.
Sambal Oelek

This traditional Indonesian chili sauce is a lot like Sriracha but in paste form. While the base of both is similar—red chile peppers, vinegar and salt—sambal oelek is chunkier than Sriracha and not as smooth; you’ll still see the pepper seeds, for instance. It’s also a bit spicier than Sriracha since there are less ingredients (no sugar or garlic).
Huy Fong Foods, the same producers of “rooster” Sriracha, also makes sambal oelek (it has the famous rooster on the label, too), but with the chile pepper shortage that’s affecting Sriracha, Huy Fong Foods sambal oelek might also be harder to find on store shelves. There are other brands out there, and with only three ingredients, it’s pretty easy to make at home. It’s best used to season dishes, like stews, soups and noodles.
Peri-peri Sauce

If you like things spicier than sriracha, peri-peri sauce is a good way to add some heat. Made with African peri-peri peppers (also known as piri-piri and African bird’s eye chile pepper), which rank much higher on the Scoville scale than red jalapeno peppers, it packs a spicy punch. Other ingredients can include lemon, garlic, salt, onion, vinegar and other herbs and spices.
As a condiment, peri-peri sauce is a good substitute for Sriracha, but it’s definitely hotter. You can use it in marinades, or as a marinade on its own, like in this sweet and hot chicken dish. Trader Joe’s makes a peri-peri sauce, which they tout is good for everything from hummus to tater tot nachos. Nando’s is a popular brand that’s pretty widely available, too.
Gochujang

Gochujang is a staple in Korean cooking. The thick, sticky paste is sweet, spicy and a little funky (in the best way) with a concentrated flavor. Unlike Sriracha, it sometimes needs a bit thinned out, which is why it’s good for marinades and sauces. Made with red chili powder, sticky rice, fermented soybean powder, malt barley powder and salt, it’s not as spicy as Sriracha, making it ideal for dishes that call for a sweeter umami-packed bump.
One popular Korean brand, O’Food Gochujang Korean Red Chili Pepper Paste, can be ordered if you can’t find it at a local grocery store. Brooklyn-based Bushwick Kitchen makes Weak Knees Gochujang Sriracha, that’s pretty tasty. Use either as a meat marinade, especially in traditional Korean bibimbap, in noodle bowls, or stirred into soups and stews. Gochujang is a great addition to something like these gingered short ribs and a good Sriracha substitute in this slow-cooker Korean beef recipe. You can use it in this vegetarian stir-fry rice bowl or this Korean sausage bowl, too.
Sweet Chili Sauce

Made from basically made of the same ingredients as sriracha—red chiles, garlic, salt and vinegar—sweet chili sauce has a different flavor profile thanks to sugar and other ingredients. Sweet chili sauce doesn’t have as much hot pepper, however, so it’s not as spicy but still has a little zip.
On its own, the thicker but still pourable sauce is perfect for dipping spring or egg rolls, pan-fried pot stickers, fried shrimp or chicken. It makes a dynamite barbecue sauce for ribs, and is an absolute must for Thai sweet chili pork bowls and sweet chili orange chicken. There are many brands on grocery store shelves, each tasting a little different depending on the recipe; some may have more chiles, some more sugar, some might be a little funky. We like Mae Ploy Sweet Chili Sauce for its chunky texture and Trader Joe’s version for its balance. Thai Kitchen’s Sweet Red Chili Sauce is always a good bet, too.
Harissa

You’ve probably seen more recipes calling for harissa as the spicy, thick paste has gained popularity around the country. An integral part of North African cooking, it’s a combination of dried chiles like bird’s eye and serrano, oil, and herbs and spices like coriander, cumin, caraway and garlic. It has varying degrees of heat depending on the recipe, and some can be quite hot.
Compared to Sriracha, harissa is more herbal and savory, and can really add some oomph to just about anything. Mix it into plain hummus for a unique kick, or with ketchup for a spicy dip for fries or for your burgers. Add a spoonful or two to these Moroccan chicken tagine pockets or West African chicken stew or as a sauce for braised beef. You’ll most likely see it in a jar on grocery store shelves and gourmet markets. Mina Harissa is quite delicious, as is Trader Joe’s. Mustapha’s Mediterranean Harissa is balanced and complex, made with chiles, red pepper and preserved lemon.
Fly by Jing Zhong Sauce

Inspired by a classic Chengdu street snack, this sauce simmers an aromatic soy sauce with brown sugar, toasted sesame oil, dried chiles, mushrooms, garlic and spices. It’s spicy but not too hot from the piquant chiles, kind of tangy-sweet, full of umami, and intense enough that you don’t want to use too much but super versatile.
This savory and sweet sauce is more akin to chili crisp or oil than Sriracha, but it’s a great substitute for Sriracha when using it on anything from pot stickers to scrambled eggs, breakfast burritos, burgers and sandwiches. Look for Fly by Jing’s Zhong Sauce wherever you find the Fly by Jing Chili Crisp, in your local grocery store or online.
Homemade Hot Sauce

At first you might think making your own hot sauce isn’t worth the effort, especially since there are so many varieties widely available at the store. But we’re here to tell you it’s definitely easier than you think.
There are many ways to make hot sauce—the choice of chile peppers seems endless, plus herbs and spices, whether you use fermentation or simply simmer your sauce on the stove. Our recipe for homemade spicy hot sauce uses garden-fresh ingredients (even carrots!) for a delicious hot sauce you’ll want to put on everything.
Ketchup and Hot Sauce

While making Sriracha on your own isn’t difficult, in a pinch you can simply blend your favorite ketchup with Frank’s RedHot or other Louisiana-style hot sauce. Together they make something that closely resembles the sweet, vinegary taste of Sriracha.
Ketchup adds the right texture with a bit of umami and sweetness, and the hot sauce, while too thin and spicy to be a one-to-one Sriracha substitute on its own, brings the acid and heat. Start with a ratio of about three to one (ketchup to hot sauce), and spice it up from there.
Other Sriracha Brands

Of course, Huy Fong Foods isn’t the only Sriracha out there! Trader Joe’s sriracha is a good alternative for the “rooster” sauce, and well-known brands like Kikkoman have their own version. Brooklyn-based Bushwick Kitchen makes Weak Knees Curry Sriracha (the same company who makes the gochujang blend mentioned above), and even Frank’s RedHot makes a Sriracha. If you go to any Asian grocery store, you’ll see different Sriracha brands on the shelf, as well. Give any a go! You may find your new favorite.
Picture this: you’re at your local Burger King about to place your classic go-to order. But then, it comes time to choose a side. The choice is a difficult one—should you go with french fries or onion rings? You can’t decide; both are too tempting. How can you choose between two such enticing options?
Now, thanks to Burger King’s recent innovation, customers at some Burger King locations won’t have to choose. BK has announced that the chain is testing out a new side combo that is any fast-food fan’s dream—a fusion of french fries and onion rings. We know, this sounds too delicious which is why we’ve got you covered on all of the crispy details!
What Are Fries n’ Rings?
View this post on Instagram
BK is fittingly calling the side combo “Fries n’ Rings.” We’re calling it a genius combination of fries and onion rings in one easy order. The side equally combines some classic BK fries with crispy onion rings. Burger King is one of the only fast-food chains to offer onion rings, so it’s no wonder they’re so popular.
The side combo can be ordered as an item by itself or with a combo meal at participating BKs. Florida BK fans who are lucky enough to frequent the Miami and Fort Lauderdale locations will have access to this ultimate side.
When Will Fries n’ Rings Be Available?
Customers can already pick up an order of Fries n’ Rings! The dream team side combo became available on June 19. However, fans will need to grab the side combo fast, as it will only be available through July 20.
And if you don’t have access to the tested item, not to worry! Here’s how you can make your own homemade onion rings and fries at home.
Taste of Home’s infatuation with Our Place’s collection of sleek pans and tableware is no secret. From the viral Always Pan which boasts a celebrity-tier following to the family-sized Perfect Pot, this coveted cookware earned a well-deserved spot as some of our favorite kitchenware. With so many popular kitchen tools, it was only a matter of time before the brand announced its foray into appliances.
In small apartments (or homes with limited counter space), finding multifunctional kitchen appliances is crucial. Our Place seeks to solve this conundrum with its newest launch: the Our Place Wonder Oven. This 6-in-1 oven replaces four different appliances—and looks darn good doing it.
What is the Our Place Wonder Oven?

Thanks to Our Place’s latest appliance release, there’s no need to have a fleet of luxury appliances that offer separate cooking modes. The Our Place Wonder Oven is an all-in-one appliance that air fries, bakes, toasts, roasts, broils and reheats—all in one single machine!
Similar to the viral, editor-tested Balmuda toaster oven, the Our Place Wonder Oven uses a small shot of steam to soften the interior of baked goods while browning them. The steam feature isn’t the only reason we’re smitten with the Wonder Oven, though. Our Place’s toaster oven is an appliance powerhouse: an oven, toaster, air fryer and microwave—all in one. Included are a range of accessories: a PFAS-free bake pan, air fryer basket, wire rack and crumb tray that tackle almost any meal.
Two tiers of racks—reminiscent of a traditional oven—can cook multi-course meals in the Wonder Oven. Remove the top rack to fit an entire four-pound chicken for parties. Or, keep the dual rack setup intact to roast up veggies on one rack and toast sourdough on the other. Plus, unlike some cheap air fryers, the Wonder Oven uses zero toxic chemical coatings.
Despite the many capabilities of the oven, there’s another reason we don’t want to hide it in a cramped cupboard. Like the brand’s cookware and tableware, the Wonder Oven looks lovely sitting on the counter. Subtle shades with names like steam, char, blue salt and spice bring a chic vibe to any kitchen. The square design and appealing dials add a modern look that complements other kitchen appliances.
It looks especially classy next to Our Place’s mini cookware!
Features
- 6-in-1 capabilities: air fry, bake, toast, roast, broil and reheat
- Steam technology supports soft interiors
- Small footprint at only 11-inches wide
- Fast preheating
- Multiple racks
- Looks pretty on the counter
How To Use It
Using the Our Place Wonder Oven is as simple as using the average toaster oven, with a few small notes. Instead of just having dials that control the temperature and cooking time, the oven also has a third dial for the cooking method. To use the oven, set the cooking method and temperature by turning the control dials.
The oven takes about five minutes to preheat, at which point it’s time to add the food and turn the cooking time dial to the appropriate time. To use the steam function, simply add water to the valve at the top of the oven using the included measuring cup. The oven automatically dispenses the steam during cooking, softening and reviving stale baked goods in seconds.
Where to Buy the Our Place Wonder Oven

The Our Place Wonder Oven is available on the Our Place website. Some multifunctional ovens ring up at as much as $500. However, there’s no need to wait for an Our Place sale to afford this oven—pick it up for under $200 at the regular price! Combat appliance clutter by splurging on this 6-in-1 today.
Want more fun product picks and money-saving deals from our shopping experts and Test Kitchen? Sign up for the Stuff We Love newsletter.
Tired of picking up pieces of water balloons strewn about the yard? Stop tying tiny hundreds of little knots so the kids can have some summer fun. Reusable water balloons are here, and they’re easy for little hands to fill without assistance. They’re a smart find for warm-weather holidays and make Fourth of July games easier than ever to set up.
What are reusable water balloons?
Reusable water balloons are the must-have outdoor game for kids and adults alike. Like traditional water balloons, the reusable version fills up with water and explodes upon impact. The biggest difference is that the reusable balloons offer over 1,000 uses rather than being a single-use item, making them a cost-effective choice.
Because they’re a reusable product, the balloons an excellent eco-friendly alternative to other summertime activities. Unlike traditional water balloons that leave pieces of hazardous latex rubber around the yard, these water balloons don’t pose a risk to pets. Plus, they’re incredibly simple to use, which makes them ideal for small children.
These balloons recently went viral on TikTok. Hundreds of videos, like the one from @dreamteamsworld below, show off folks having the time of their lives with these easy-to-fill balloons. Users show off how they amp up their adult party games and backyard barbecues with these fun summertime toys.
@dreamteamsworld #ad Endless sumner fun with reusablewaterballoons! Use #reusesummerfun for a chance to win prizes! Use code: SoppycidFun to save! #asmr #summer
How to Use Reusable Water Balloons

Reusable water balloons are incredibly easy to use. Filling them requires nothing more than a bowl brimming with water. Not needing faucets or hoses makes them an A+ choice for camping games. Plus, it’s simple to haul these mini balloons to the beach or along on vacation.
Simply open the balls, submerge them in water and “snap” them closed. That’s it! Once filled, throw them at objects or people for an exciting outdoor activity that doesn’t make a mess. Once the balloon explodes on your opponent, just dunk it in water again and continue the friendly competition. Thanks to the clever closing design, there’s no need to pause the action to struggle with small knots.
What Other People Are Saying

Over 1,100 shoppers give the reusable water balloons five out of five stars, and praise them for their simplicity, cost effectiveness and eco-friendly spin.
Eric, a five-star reviewer, writes, “Quite possibly the best money I’ve spent in a long time! My kids always want to do water balloons, but they can’t fill them on their own. These are amazing! They can fill them up independently and they don’t leave little balloon pieces all over the yard. 10/10 would recommend!”
“These reusable water balloons arrived in time for some really hot days. Delivery was fast! The product is exactly as advertised. They fill quickly. They don’t hurt when being hit by one,” shares verified purchaser, Karen C.
“My 3-year-old can EASILY fill up these balloons by himself!” says C. Anderson, a verified buyer. “It keeps him busy and is great for independent play! I’ve been looking for fun water toys that don’t involve guns or balloons that end up in small pieces that get thrown away or lost in the grass. These are PERFECT! I ordered another set already!”
Where to Buy Reusable Water Balloons

Reusable water balloons are available on Amazon. They retail at $44 for a 16-pack, but are also available in four-, six-, 12-, 18- and 20-count packs. While a bit on the pricey side, the balloons last for several summers, so the price evens out over time. Plus, kids love using them, so it takes them away from the couch and encourages outdoor time. That’s a win on our book!
Want more fun product picks and money-saving deals from our shopping experts and Test Kitchen? Sign up for the Stuff We Love newsletter.
Although I have a huge sweet tooth, I like to eat healthy as often as possible. I’m also a rampant snacker—and recipes that are healthy, sweet and good for snacking are sometimes hard to come by.
Protein balls check all three boxes: They make a great high-protein snack that’s also indulgent enough to taste like dessert! Keep our recipe for protein balls on hand for whenever you need a sweet and satisfying morsel (or three).
Key Ingredients in Protein Balls
Protein balls are generally very customizable, but here are the important elements in our recipe.
- Oats: Oats are a common base ingredient for many no-bake protein ball recipes. Their flavor pairs well with anything and they add a little bulk. (Of course, there are plenty health benefits of oats to keep in mind, too.)
- Honey or maple syrup: No matter which you choose, honey or maple syrup will add just the right amount of natural sweetness without turning to artificial options.
- Nut butter: Peanut butter adds flavor and acts as a sticky binder for all of the other ingredients.
- Chia seeds: In our recipe, chia seeds aid the chocolate chips in adding some crunch. (In recipes like chia pudding, they absorb liquid and aren’t as crunchy.) Chia seeds also contribute calcium and fiber.
- Protein powder: While you can technically make protein balls without protein powder, it’s an easy and quick way to increase the amount of protein in each ball if you have some at home. Be sure to use a protein powder with a flavor you like—many powders out there aren’t as pleasant as they’re marketed to be. Our recipe calls for chocolate or vanilla, but feel free to branch out a bit if it means you get to use a taste you like.
How to Make Protein Balls
Our recipe yields 2-1/2 dozen protein balls, or 30 servings if you only eat one at a time (unlikely). The amount of protein each ball provides depends on the protein powder you use.
Ingredients

- 1-1/2 cups quick-cooking oats
- 1/2 cup chia seeds
- 1/2 cup honey or maple syrup
- 1/2 cup creamy peanut butter
- 1/4 cup vanilla or chocolate protein powder
- 1/4 cup miniature semisweet chocolate chips
Directions
Step 1: Mix the ingredients together and refrigerate

In a large bowl, combine all ingredients. Refrigerate for 1 hour, or until the mixture is firm enough to roll into balls.
Step 2: Roll the mixture into balls

Shape into 1-1/2-in. balls and transfer them to an airtight container.
Step 3: Store and enjoy
Store your homemade protein balls in the refrigerator. Sneak some from the container whenever the craving strikes!
Protein Ball Variations
With just a few easy swaps, you can make protein balls with different flavors. Here are some of our favorites.
Almond Coconut Protein Balls

- 1-1/2 cups quick-cooking oats
- 1/2 cup almond butter
- 1/2 cup honey or maple syrup
- 1/4 cup vanilla or chocolate protein powder
- 1/4 cup miniature semisweet chocolate chips
- 1/4 cup unsweetened shredded coconut
Combine all of the ingredients. Refrigerate for 1 hour, or until the mixture is firm enough to roll. Shape into 1-1/2-in. balls, rolling in additional coconut if desired. Store in the refrigerator.
Chocolate Peanut Butter Protein Balls

- 1-1/2 cups quick-cooking oats
- 1/2 cup creamy peanut butter
- 1/2 cup honey or maple syrup
- 1/4 cup chocolate protein powder
- 1/4 cup miniature semisweet chocolate chips
Combine all of the ingredients. Refrigerate for 1 hour, or until the mixture is firm enough to roll. Shape into 1-1/2-in. balls. Store in the refrigerator.
Other Protein Ball Ideas
It’s easy to make protein balls your own! Instead of mini chocolate chips, you could use M&M’s, white chocolate chips or even raisins. Use any kind of nut butter you like. (Flavored varieties would be a great way to add more flavor without additional ingredients.) Otherwise, add spices like cinnamon or pumpkin pie spice to the mix.
Tips for Making Protein Balls
Can you use different types of oats to make protein balls?
We recommend quick-cooking oats, but you could use old-fashioned if that’s what you have on hand. Protein balls with old-fashioned oats will just be a little bit chewier since the oats aren’t as processed. Learn more about the different types of oats.
Why are my protein balls falling apart?
If your protein balls are falling apart, they need a little more moisture. Add a little extra nut butter or liquid sweetener to keep everything together. Some recipes even recommend adding a splash of your favorite milk.
How do you serve protein balls?
Protein balls are a wonderful healthy snack to have on hand. Each ball is low in sugar and clocks in at under 100 calories. However, you can also eat them as a health-conscious dessert or sweet finish to a high-protein breakfast. You could also eat one alongside your favorite protein bar, or a couple in place of a protein bar before or after a workout.
How long will protein balls last?
Protein balls will last for up to a week in an airtight container in the fridge. We’re sure they’ll disappear more quickly than that, though!
Can you freeze protein balls?
Definitely. If you want to freeze them, keep them in a freezer container for up to 3 months. Pull them out of the freezer the night before you plan to eat them—otherwise you’ll have to gnaw at them instead of enjoy them for the chewy, crunchy bites that they are.
Taking your clothes to the dry cleaner every month (or every week!) can be an expensive hassle. That’s why it’s useful to know the dos and don’ts of washing delicate clothing at home.
Keep in mind, sometimes it’s safer to follow the rules (please, don’t throw your wool three-piece suit in the washer), but some fabrics do have a little more wiggle room when it comes to their care. For those garments, here’s how to dry clean at home.
Can You Wash Dry Clean Only Clothes?
If the care label on your clothing says “dry clean only,” don’t put it into your washing machine. However, clothing tags marked “dry clean” or “dry clean recommended” may be washed at home if you follow the right steps.
Take a look at the type of fabric as well. Clothing made of suede, leather, sequined items, velvet and anything with fur should be dry cleaned. Cotton, polyester, linen and even silk and wool can usually be safely washed at home.
How to Wash Dry Clean Only Clothes at Home
Machine Wash
To machine wash your dry clean items at home, turn them inside out and place them in the washer. Wash on the gentle or delicate cycle, with cold water and a mild detergent. The gentle cycle uses a low-speed spin and mild wash action to reduce the risk of damaging or tangling clothes. And cold water makes clothes less likely to shrink, fade or pill. Remove the clothing from the machine as soon as the cycle ends, and then lay flat to dry.
Hand Wash
For extra delicate clothing, skip the washing machine and hand wash instead. Fill a clean sink or washing tub with cold water and add a small amount of detergent, stir the water by hand to activate the suds. Immerse clothing into the soapy water and gently swish it around with your hands. Empty the sink or tub, then fill it again with cold, clean water. Rinse the clothing, and repeat as needed until all the soap is gone.
Then, gently squeeze out the excess water (do not wring) and lay flat to dry. If needed, you can also roll the garment up in a dry towel to gently remove the water before air drying.
Dry Cleaning Kit
At-home dry cleaning kits like the Woolite At-Home Dry Cleaner refresh clothes in the dryer. They can work well on lightly soiled clothes you’ve only worn once or twice for a short period of time. First, spot-clean the garment with the included stain wipes. Then place the clothes in the dryer along with one of the dryer-activated cleaning cloths. Tumble dry on medium heat for 20 minutes. The cleaning cloth will help lift away odors and release wrinkles. Remove clothes immediately after the dryer cycle has stopped.
You don’t have to be a rocket scientist to understand why Applebee’s spinach artichoke dip is a bestselling menu item. Warm, bubbly and cheesy, this simple yet indulgent recipe is studded with chopped artichokes and just enough spinach to pass it off as a serving of veggies.
What could be better? How about an easy Applebee’s copycat recipe you can make at home!
Made with simple, everyday ingredients and ready in under an hour, this satisfying dip will quickly become your go-to recipe for every occasion. Whether you have plans for a cozy date night at home or need a centerpiece for your game day potluck, copycat Applebee’s spinach artichoke dip is the answer.
How to Make Applebee’s Spinach Artichoke Dip
This recipe comes from Hollie Gabriel of Topeka, Kansas, and will make 3-1/2 cups of dip.
Ingredients
- 1 jar (15 ounces) Alfredo sauce
- 4 ounces cream cheese, softened
- 1/2 cup grated Parmesan and Romano cheese blend
- 1/2 cup shredded mozzarella cheese, divided
- 1 garlic clove, minced
- 1 can (14 ounces) water-packed artichoke hearts, drained and chopped
- 1 package (10 ounces) frozen chopped spinach, thawed and squeezed dry
- Tortilla chips, for serving
Directions
Step 1: Combine the Alfredo and cheeses
Preheat the oven to 350°F.
In a large bowl, combine the Alfredo sauce with the cream cheese, Parmesan and Romano cheese, 1/4 cup mozzarella cheese and garlic. Mix well so no large lumps of cream cheese remain.
Step 2: Stir in the veg
Stir in the artichokes and frozen spinach until evenly combined.
Editor’s Tip: Hoping to use fresh artichokes? Experiment and roast the artichokes before adding them to the dip.
Step 3: Top with more cheese
Transfer to a greased 4 or 5-cup broiler-safe baking dish and sprinkle with the remaining 1/4 cup mozzarella cheese.
Step 4: Bake until bubbly
Bake, uncovered, until the cheese is melted and the dip is bubbly; about 20-25 minutes. Remove and place on a sheet pan.
Step 5: Broil to golden perfection
Next, preheat the broiler with your oven rack positioned 4 to 6 inches from the upper heating element. Broil the dip until the top is golden; about 1 to 2 minutes. Remove promptly and serve with tortilla chips. Enjoy!
Editor’s Tip: Don’t walk away with the dip under the broiler! That’s one of the most common broiler mistakes.
Tips for Making Copycat Applebee’s Spinach Artichoke Dip

Shred the cheese yourself so it melts down better
While preshredded cheese is a marvelous invention, it’s not the best option for every recipe. To make a spinach artichoke dip that is perfectly melted and creamy, opt for whole blocks of cheese you shred yourself. Preshredded cheeses contain additives like cellulose that prevent the shreds from clumping and sticking in their packaging and (unfortunately) inhibit their ability to melt smoothly when making cheesy dips or sauces (like Applebee’s beer cheese dip).
Other ways to cook/heat up spinach artichoke dip
If you’re up for an experiment, prepare this Applebee’s spinach artichoke dip on your stovetop or in a Crockpot.
- To prepare in a Crockpot, use this slow-cooker spinach artichoke dip recipe as a guideline.
- For the stovetop, mix the ingredients together in a large nonstick saucepan or deep skillet (choose one that’s broiler-safe). Then warm gently over medium heat until creamy and the cheese is melted. Top with additional cheese and then transfer to the broiler and cook as directed.
Editor’s Tip: Leftover baked spinach artichoke dip can be warmed in the microwave. For best results, add a splash of milk or cream to the dip before reheating and use a reduced power setting on your microwave to maintain the dip’s creamy consistency. (Don’t miss these other microwave tricks.)
Make spinach artichoke dip ahead of time
Make-ahead Applebee’s spinach artichoke dip is an excellent option if you’re working ahead for a big event. Prepare the copycat recipe as directed through step 3 and then cover it tightly with plastic. Before baking, remove the dip from the fridge and let it come to room temperature for about an hour. Then, bake and broil as directed. Store the unbaked dip in the refrigerator for up to 3 days until ready to serve.
You can also freeze Applebee’s spinach artichoke dip, either baked or unbaked, for up to 3 months in an airtight, freezer-safe container. Allow the dip to defrost overnight in the refrigerator before baking and broiling as directed.
Love homemade versions of your favorite restaurant menu items? Don’t miss these other top-rated copycat recipes.
It’s taken me a few years to figure it out, but I can say with confidence that “gifts” is my love language. Contrary to my initial misjudgment of the categorization, there’s nothing superficial or materialistic about loving to receive and give gifts.
Price tag aside, gifts are my preferred way to show loved ones how much (and, oftentimes, why) I love them. Whether it’s a Birthdate Candle for my best friend with whom I share a star sign or a Boarderie platter for my newly engaged sister and her foodie fiance, gifts are a tangible testament to my affection.
Nothing makes my heart sing louder than discovering a customizable product that will genuinely appeal to tons of people in my circle. I get all the fulfillment of giving a heartfelt gift to one of my favorite people—but without the stressful brain-racking.
For the last year or so, the Jack of all Trays tray has been that thoughtful yet one-size-fits-all gift for so many people in my life.
What is Jack of all Trays?

Produced by Statement Home, the Jack of all Trays, in its most basic form, is a handled acrylic serving tray that comes in white, black, clear or bamboo. The original tray is 20-by-12 inches, and the new mini-size trays are 9.5-by-11.5 inches. That’s all well and good, but it sounds like nothing remarkable, right? See, the double-sided inserts are where things get interesting.
Purchase inserts that match any holiday, season or design style to place within the tray. Statement Home offers marbled inserts, game-day inserts, Mr. & Mrs. inserts—you name it. They fit seamlessly within the acrylic tray and are swapped out with ease. There’s nothing like themed, conversation-starting serve ware for social gatherings.
Why I Love It
The trays are cute—plain and simple. Even though my sister and I don’t have overlapping styles, she’d also think this product is cute because her inserts wouldn’t be the same as mine. The “Groovy Baby” insert is more my speed, and “The Neutral Ground” insert is totally calling her name. That’s the beauty of Jack of all Trays.
No matter if you have a housewarming or wedding coming up, these trays are ultra-giftable. Plus, you can grow the receiver’s collection of inserts with each future gift-giving occasion.
I gave a clear tray and a few inserts to my boyfriend’s mom for her birthday, and she’s had it on constant display ever since. Let’s just say I know what she’s getting for Christmas too. Shh!
It’s a gift I never feel guilty about giving because it’s so simple to stow. A traditional holiday-themed serving tray would take up the same amount of room but only be used once a year. I don’t know about you, but I (and most people I know) don’t have that kind of kitchen storage space to spare.
With Jack of all Trays, you can stack the inserts within the acrylic base for a small footprint that makes big waves when brought out of the cabinet or pantry.
Where to Buy Jack of all Trays

You can buy Jack of all Trays on the Statement Home website. The original trays and their inserts cost $55 and $25 respectively. And the minis and their inserts cost $32 and $15 respectively. Time to trade out stale gift ideas and serve up something new with Jack of all Trays!
Want more fun product picks and money-saving deals from our shopping experts and Test Kitchen? Sign up for the Stuff We Love newsletter.
Whether you’re sifting through Mom’s recipe box or tasty eats on Pinterest, you’ll often find that recipes call for room-temperature ingredients. So what is room temperature and why is it important to your cooking and baking? We’ll fill you in!
What Is Room Temperature?
Room temperature isn’t a precise number. Rather, it’s a range that spans about 68º to 72ºF. Because this is a general term, there’s some wiggle room here, so if your house is a little chilly at 65º, it’s still OK to call that butter room temp.
Now, why is it important for certain ingredients to be used at room temperature? Well, room-temperature butter, cream cheese and eggs incorporate into batters, doughs, buttercreams and other recipes more readily. They also create a smoother end product, especially when it comes to frosting.
How to Bring Ingredients to Room Temperature
As important as room-temperature ingredients are in baking, it’s easy to forget about taking eggs or a few sticks of butter out of the fridge before you want to make cookies. The good news is that there are a few tricks to bringing all sorts of ingredients up to temperature in a flash.
How to Get Eggs to Room Temperature

Eggs that have warmed up a bit after being in the fridge blend into doughs and batters more easily. Room-temperature eggs also create loftier meringues.
If you need to bring your eggs up to temp, place them in a bowl of warm (not hot) water for 10 to 15 minutes. This will remove the chill.
How to Make Butter Room Temperature

It’s always a bummer when you have the urge to make a batch of chocolate chip cookies and you remember that all your butter is still in the fridge. Don’t fret, though. There are a few tricks to softening butter fast.
The first technique is simple: Use a box grater to break down the butter into even smaller pieces. This works for butter from the fridge or right out of the freezer.
You can also cube the butter into smaller pieces. The more surface area and the smaller the portions of butter are, the more quickly it’ll warm up.
Lastly, you can make a mini heat dome, a viral trick for softening butter. Fill a tall glass or bowl with hot water and let it sit. Then empty the vessel and place it upside-down over the butter. The heat will gently warm up the butter in 10 minutes or less.
How to Bring Cream Cheese to Room Temperature

Soft cream cheese is a must whether you’re stirring up a batch of cream cheese frosting or making a creamy dip to enjoy at a party.
If you need to soften cream cheese, cube it and let it sit at room temperature for about 30 minutes. Like with butter, the smaller the pieces, the more quickly this ingredient will soften.
If you’re really in a rush, you can also soften cream cheese in the microwave. Remove the cream cheese from its foil wrapper and zap in five-second increments until it’s pliable—about 20 seconds total.
Is Room-Temperature Dairy Safe?
Room-temperature dairy products are safe to use if enjoyed within a specific span of time, which varies by product. Here’s how quickly you should use these room-temp foods:
- Butter: According to the USDA, it is safe to leave butter at room temperature for several days. During warm months, though, it’s best to use butter within a day or two so it doesn’t get rancid. (Did you let it go too long? Your nose will know.)
- Milk, cream, cream cheese, sour cream, yogurt and more: Other dairy products can be left out at room temperature for up to two hours, per the USDA. If temperatures are higher than 90º (at a summer cookout, for example), use those products within an hour.
- Eggs: The two-hour rule also applies to eggs.
We often think of ice cream as the quintessential no-bake summer dessert. Though it is deliciously creamy, sweet and luxurious, it is also laden with fat, sugar and calories. For those of us looking for a healthier but still satisfying alternative, TikTok has numerous easy recipe recommendations.
Recently, one particular sweet alternative has been garnering viral attention: strawberry-yogurt clusters. The four-ingredient dessert comes from food influencer Nicole Keshishian Modic (@kalejunkie) and has received over 167 million views on TikTok. Here’s everything to know about the viral strawberry-yogurt clusters, including how you can make them yourself.
What Are Strawberry Yogurt Clusters?
The viral strawberry-yogurt clusters are a healthy, sweet snack or dessert. They are frozen, fruity and creamy, with an “ice cream-ish vibe,” according to Modic. Check them out for yourself in her video below.
@kalejunkie This is the snack of the summer! Chocolate covered strawberry yogurt clusters! #healthyrecipes #greekyogurt #easyrecipes #strawberries ♬ Pretty Girl Era – LU KALA
How Can I Make the Viral Strawberry Yogurt Clusters?
To make the strawberry-yogurt clusters, you will need a small bowl, a medium bowl, spoons, parchment paper and a baking sheet. You will also need access to a freezer and a microwave. If you don’t have access to a microwave, you can also melt the chocolate over the stovetop.
This recipe has been edited and adapted for clarity. See the original version Modic shared with Good Morning America here.
Ingredients
- 2 cups of chopped strawberries
- 1 cup vanilla or plain Greek yogurt
- 1 cup chocolate chips
- 1 teaspoon coconut oil
- Flaky sea salt (optional)
Directions
Step 1: Combine ingredients
Add the chopped strawberries and Greek yogurt into a medium-sized bowl. Toss them to coat.
Step 2: Prep the strawberry-yogurt clusters
Line a baking sheet with parchment paper. Scoop 2- to 3-tablespoon-sized clusters of the strawberry-yogurt mixture onto the parchment-lined baking sheet. Place the baking sheet into the freezer and chill the strawberry-yogurt clusters for 20 minutes.
Step 3: Melt the chocolate
In a separate small bowl, add the chocolate chips and coconut oil. Use a microwave to melt the chocolate in 30-second increments. After each increment, stir the chocolate, then microwave again until combined and fully smooth.
Step 4: Dip the clusters
Once the chocolate is melted and the strawberry-yogurt clusters are frozen, dip the frozen dessert clusters into the chocolate to fully coat. Place the chocolate-coated clusters back on the parchment-lined baking sheet; the chocolate will harden into a shell around the frozen strawberry-yogurt clusters.
While the chocolate is drying, add a sprinkle of flaky sea salt on top of the clusters, if desired. Enjoy!
Leftovers can be stored in the refrigerator for up to one week or in the freezer for up to one month.

Grilled Banana Brownie Sundaes
My niece Amanda Jean and I have a lot of fun in the kitchen creating different dishes. One of us will start with a recipe idea and it just grows from there—and so does the mess. In this case, the happy result was our Grilled Banana Brownie Sundae. —Carol Farnsworth, Greenwood, Indiana
Oatmeal Cookie Ice Cream Sandwiches
If you’re tight on time, you can use store-bought cookies, but I highly recommend making these oatmeal chocolate cookies from scratch. The dessert sandwiches are pure fun. Sometimes I decorate the sides of the sandwiches with colorful jimmies, too. —Diane Halferty, Corpus Christi, Texas
Quick Bananas Foster
Guests are always impressed when I ignite the rum in this delicious bananas Foster dessert. Use perfectly ripe bananas for best results. —Mary Lou Wayman, Salt Lake City, Utah
Ice Cream Balls
These ice cream balls are a fun and easy dessert to fix—even the kids can help. The cereal adds a crunchy texture to the ice cream and makes an everyday treat something special. —Anne Marie Woodhull, Cedar Springs, Michigan
Frozen Pumpkin Dessert
This frozen pumpkin ice cream dessert can be prepared and frozen weeks in advance. I've found it has more mass appeal than traditional pumpkin pie. —Susan Bennett, Edmond, Oklahoma
Rocky Road Freezer Pie
Whip up this simple chocolaty pie the day before and you’ll feel just like the champ when you serve it on party day. —Addrenne Roth, Donna, Texas
Toffee-Peach Ice Cream Pie
A sugar cone and brickle crust, fresh peaches and ice cream—you can't go wrong! Top with hot caramel for a delectable frozen treat. —Kim Ciepluch, Kenosha, Wisconsin
Quick Icebox Sandwiches
My mother liked making these cool, creamy treats when I was growing up in the States because they're so quick to fix. Then I made them for my three kids.—Sandy Armijo, Naples, Italy
Berry White Ice Pops
Nothing says summer like an ice pop. Kids and adults alike love this fruit-filled version. —Sharon Guinta, Stamford, Connecticut Try more refreshing popsicle recipes.
Apple Pie a la Mode
This pie a la mode is a family favorite that combines apple pie filling and butter pecan ice cream with caramel topping and chopped nuts. I created it when trying to think up a rich dessert to complete a dinner party menu. —Trisha Kruse, Eagle, Idaho
Mocha-Pecan Ice Cream Bonbons
These bite-sized bonbons may sound tricky to make, but you'll find that fashioning them is a breeze. What's more, our cooking experts advise that you keep this recipe handy when you serve them—as soon as folks sample the treats, they'll be asking how to make them. —Taste of Home Test Kitchen
Swirled Blueberry Frozen Yogurt
A silky homemade sauce is anything but vanilla when it comes to topping a scoop. These are the touches that make celebrations extra special. —Christina Seremetis, Rockland, Massachusetts
Frozen Banana Cereal Pops
When we want a healthy snack, we dip bananas in yogurt, roll 'em in cereal, then freeze. Ta-da! —Scarlett Elrod, Newnan, Georgia
Ice Cream Cookie Dessert
Our family loves dessert, and this chocolaty, layered treat is one of Mom's most-requested recipes. It's so easy to prepare this Oreo ice cream cake! —Kimberly Laabs, Hartford, Wisconsin
Candy Craze Ice Cream Sandwiches
These ice cream sandwiches have a little bit of everything in them to satisfy all your cravings. —Lauren Knoelke, Milwaukee, Wisconsin
Birthday Cake Freezer Pops
On my quest to find birthday cake ice cream—my favorite flavor—I came up with these easy ice pops. Now, instead of going to the store whenever a craving hits, I just head to my freezer. —Dawn Lopez, Westerly, Rhode Island
Creamy Coffee Pie
It’s easy to stir mini marshmallows, mini chocolate chips and crushed sandwich cookies into coffee ice cream to create this irresistible frozen dessert. —Cherron Nagel, Columbus, Ohio
Patriotic Frozen Delight
My husband and I pick lots of fruit at berry farms in the area and freeze it to enjoy all year long. This frozen dessert showcases both blueberries and strawberries and has a refreshing lemon flavor. —Bernice Russ, Bladenboro, North Carolina
Frozen Berry & Yogurt Swirls
I enjoy these frozen yogurt pops because they double as a healthy snack and a cool, creamy sweet treat. —Colleen Ludovice, Wauwatosa, Wisconsin
Grasshopper Pie
I only need six ingredients to whip up this fluffy and refreshing grasshopper pie. I usually make two of the minty treats for our family, since we're never satisfied with just one slice. —LouCinda Zacharias, Spooner, Wisconsin
Frozen Chocolate Monkey Treats
Everyone needs a fun, friendly way for kids to play with food. These rich bites are nutty and yummy. Just coat bananas in chocolate and dip them into peanuts, sprinkles or coconut. —Susan Hein, Burlington, Wisconsin
Frozen Watermelon Lemon Cream Tarts
These fruit tarts are so refreshing on a hot summer day! They are extremely healthy and convenient, and just a few ingredients means they're easy to make, too. —Bethany DiCarlo, Harleysville, Pennsylvania
Rocky Road Fudge Pops
These sweet frozen treats are simple to prepare and guaranteed to bring out the kid in anyone. The creamy pops feature a special chocolate and peanut topping.—Karen Grant, Tulare, California
Freezer Strawberry Shortbread Dessert
When I’m planning party menus, I appreciate dessert recipes like this; you can make and freeze it up to two weeks before serving. A refreshing slice is welcome after a big meal.—Cassie Alexander, Muncie, Indiana
Crunchy Chocolate Mint Balls
Get a jump on the holidays by making these four-ingredient truffles and tucking them away in the freezer to save for gift-giving. Present them in mini cupcake holders for an extra-special touch. —Amanda Triff, Dartmouth, Nova Scotia
Strawberry-Rosemary Yogurt Pops
We planted strawberries a few years ago, and these tangy-sweet frozen yogurt pops are my very favorite treats to make with them! The options are endless. Try using other yogurt flavors like lemon, raspberry or blueberry. You may also substitute your favorite herb for the rosemary—or simply omit it. —Carmell Childs, Ferron, Utah
Cereal & Milk Ice Cream Sandwiches
Go ahead and buy those sweet cereals you normally stay away from. This is dessert! —Taste of Home Test Kitchen
Root Beer Float Pie
This is the kind of recipe your kids will look back on and always remember. And you don't even need to use an oven. —Cindy Reams, Philipsburg, Pennsylvania
Chocolate Hazelnut Soy Pops
I love Nutella, and I'm always looking for ways to use it. These pops are a great way to stay cool in the summer, but also make a cozy treat in the winter. —Bonita Suter, Lawrence, Michigan
Frozen Lime Cake
We've got just the thing for block parties, cookouts or anytime you need a super cool dessert. Making the crust is a snap, and the ice cream and sherbet are so delicious. Everyone loves this! —Kathy Gillogly, Sun City, California
Frozen Banana Split Pie
This dessert is special enough to make hamburgers and fries a meal to remember! It's so tall and pretty and just like eating a frozen banana split. Make it ahead to save time. —Joy Collins, Birmingham, Alabama
Frosty Peanut Butter Pie
With only a handful of ingredients, this peanut butter pie promises to deliver well-deserved compliments. Whenever I bring this creamy, make-ahead pie to get-togethers, I'm asked for the recipe. —Christi Gillentine, Tulsa, Oklahoma
Frosty Orange Cream Cheese Cups
These bite-sized frozen treats will cool you down during the dog days of summer. —Roxanne Chan, Albany, CaliforniaIn my household, there are a few days I dread more than bathroom cleaning day. And that says a lot coming from someone who finds most cleaning activities soothing. There’s just something about scrubbing the shower, sink and toilet that leaves my body feeling tired, sweaty and ready for a long nap. As an avid #CleanTok viewer, I knew I struck gold after watching satisfying cleaning video after satisfying cleaning video of creators sharing about the Labigo electric spin scrubber.
This Amazon cleaning gadget boasts a long adjustable handle and multiple brush attachments to scrub every corner of the tub for you—including grimy grout. Spoiler alert: I didn’t know how dirty my tub was until cleaning it with this powerful electric scrubber.
What is the Labigo Electric Spin Scrubber?
Cordless and adjustable, the Labigo electric spin scrubber is the bathroom cleaning upgrade you didn’t know you needed. Four scrub brush attachments fit on the end of the cordless cleaning handle, including two wide and two angled brushes. With the press of a button, the scrub brush spins super fast, offering supersonic scrubbing power—no elbow grease required.
All you have to do is guide the gadget where you want it to scrub. Bonus: The handle extends from two feet to almost four feet, so there’s no need to put your back into it to clean the tub or tile grout. Bye-bye lower back pain!
Product Features
- Cordless
- Comes with four brush head attachments
- Brush heads made from thick PC bristles safe for the tub, tile, floors, stone and grout
- Handle extends from 24.4 inches to 43.3 inches
- Rechargeable (charge lasts for 90 minutes of straight cleaning)
- Waterproof
Why I Love It

Before the Labigo electric spin scrubber, I skimped when it came to cleaning my freestanding shower and my soaking tub simply because I didn’t have the time (read: energy) to scrub every corner. I didn’t have any fancy tools, either. Just some average cleaning solution and a dish sponge.
So when I came across a cordless, electric spin scrubber that could reach every area of the tub and shower with minimal effort and leave it sparkly clean, I had to get my hands on it. Not only does it make my shower and tub feel cleaner, but this gadget also scrubs away visible layers of caked-on grime.
My current spin-scrubbing routine consists of sprinkling baking soda all over the tub and shower, spritzing tile and tub cleaner and letting it sit for a few minutes. Then, I go in with the spin scrubber, letting it work its magic for a solid five minutes before rinsing and scrubbing once more to ensure everything is thoroughly rinsed off.
Not only is the spin scrubber satisfying to clean with, but it also lifts stains and grime in mere seconds. Pro tip: Slap on The Pink Stuff on extra grimy areas before whipping out the spin scrubber. It leaves surfaces so shiny!
But Don’t Take My Word for It!
There’s a reason the Labigo electric spin scrubber has over 4,000 five-star Amazon ratings. Here’s why shoppers are ditching their traditional bathroom cleaning methods for this time-saving solution:
Verified Amazon reviewer, Christi Wilson, attests to its versatile cleaning methods: “I started using this scrubber right out of the box on my very dirty kitchen floor. I had tried to clean it three times already, and it just wouldn’t get clean. In just a couple of minutes, I saw the stains starting to go away. It’s awesome! I don’t love to clean, but this tool definitely makes the job easier and more fun.”
Where to Buy an Electric Spin Scrubber

Take this as your sign to upgrade your bathroom cleaning game by investing in an electric spin scrubber on Amazon where it goes for $77. You’ll score four different scrub attachments to reach every corner and angle—no scrubbing on your hands and knees necessary. Before this scrubber, I put off deep cleaning my shower for weeks. Now, I actually look forward to cleaning my shower thanks to this fun and easy-to-use solution. A sparkly clean shower and tub awaits.
Next, check out the Bissell Steam Shot for an extra clean bathroom.
Want more fun product picks and money-saving deals from our shopping experts and Test Kitchen? Sign up for the Stuff We Love newsletter.